• Skip to primary navigation
  • Skip to main content
  • Skip to primary sidebar

Hyams Garden Center and Accent Store

Serving Greater Charleston Area with Quality, Variety & Professionalism since 1981

  • Garden Center
    • Plants
    • Fountains, Statuary and Garden Décor
    • Planters & Pots
    • Garden Supplies
    • Hyams Gift Cards
  • Gardening Wisdom
    • Hear the Flowers Whisper
    • What does the Gardener say?
  • Services
    • Delivery and Planting
    • Fountain Installations
    • Custom Designed Pots, Containers & Window Boxes
    • Diagnostic Center
    • Special Orders
    • Christmas Tree Delivery & Set up
  • Accent & Gift Store
    • Home Décor & Gift Items
    • Life like Botanicals and Flowers
    • Wreaths, Bows & Ribbons
    • Candles
    • Seasonal Décor
    • Christmas Décor
    • Greeting Cards for All Occasions
    • Hyams Gift Cards
  • About Us
    • Location and Hours of Operation
    • Contact Us
    • Meet Our Team
  • Inventory
    • Bedding Plants
    • Bulbs
    • Fruit Trees & Plants
    • Garden Supplies
    • Hanging Baskets
    • Nursery
    • Topiaries
    • Trees
    • Tropicals
    • Vegetables & Herbs
    • Water Plants

Gardening Wisdom

June 24, 2020 By Hyams Garden Center

Diseases of the Lawn

Now is a good time to get the jump on lawn diseases. Besides applying fungicides there are several cultural practices that can help prevent them. Three most common diseases that affect the lawns are: gray leaf spot, brown patch and dollar spot. The beauty of a lawn can be quickly destroyed by these fungal diseases.

Gray Leaf Spot on St. Augustine grass
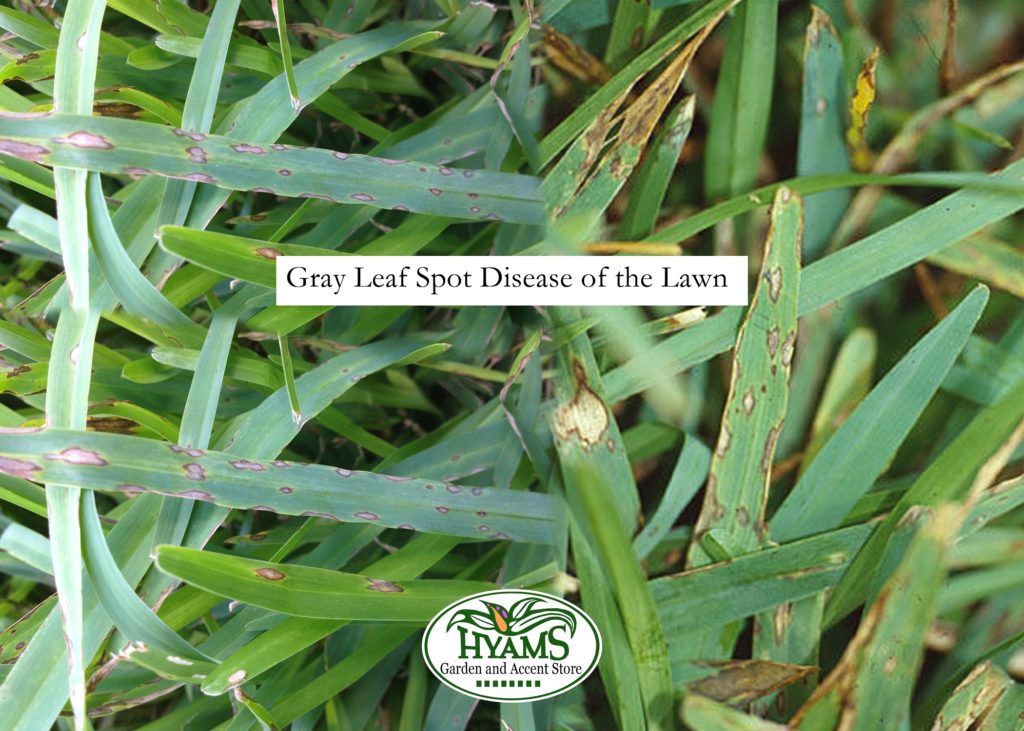
Gray leaf spot is a fungal disease that occurs most commonly on St. Augustine grass. The initial leaf spots are small and brown, but they expand rapidly into large, oval or elongate, tan to gray leaf spots, which are surrounded by purple or brown borders. A yellow halo may surround some of the spots, or a general leaf yellowing may occur.

During warm, humid weather the fungus produces a grayish mycelium (cottony fungal growth) and numerous spores on dying foliage, which gives a grayish appearance to the spots. Blades of grass will wither and die if leaf spots are numerous. Under favorable conditions for disease development, large areas of turf may appear to be scorched, resembling extreme drought stress.

Gray leaf spot is favored when temperatures are between 77 and 86 °F during the day and above 65 °F at night, and is most severe during rainy, humid periods. The fungus survives dry summer conditions as fungal mycelium and spores on dead foliage and in the thatch layer. When favorable conditions of moisture and high humidity return during the summer, the fungus produces an abundance of spores that are spread by wind, splashing rainfall or irrigation, and the movement of lawn equipment on wet grass.

How to Manage Gray Leaf Spot Disease of the Lawn?

  • Reduce thatch layer.
  • Irrigate deeply, but infrequently. This generally means one time per week with one inch of water. Always irrigate in the morning, which promotes quick drying of the foliage.
  • Avoid using post-emergent weed killers on the lawn while the disease is active.
  • Avoid medium to high nitrogen fertilizer levels.
  • Improve air circulation and light level on lawn. Limb up over-hanging trees and prune back nearby shrubs.
  • Mow at the proper height and only mow when the grass is dry. Bag and dispose of grass clippings if disease is present.
  • Control chinch bug infestations.
  • Use fungicide treatments as needed along with proper turf grass culture.

Brown Patch and Large Patch Diseases of Lawns
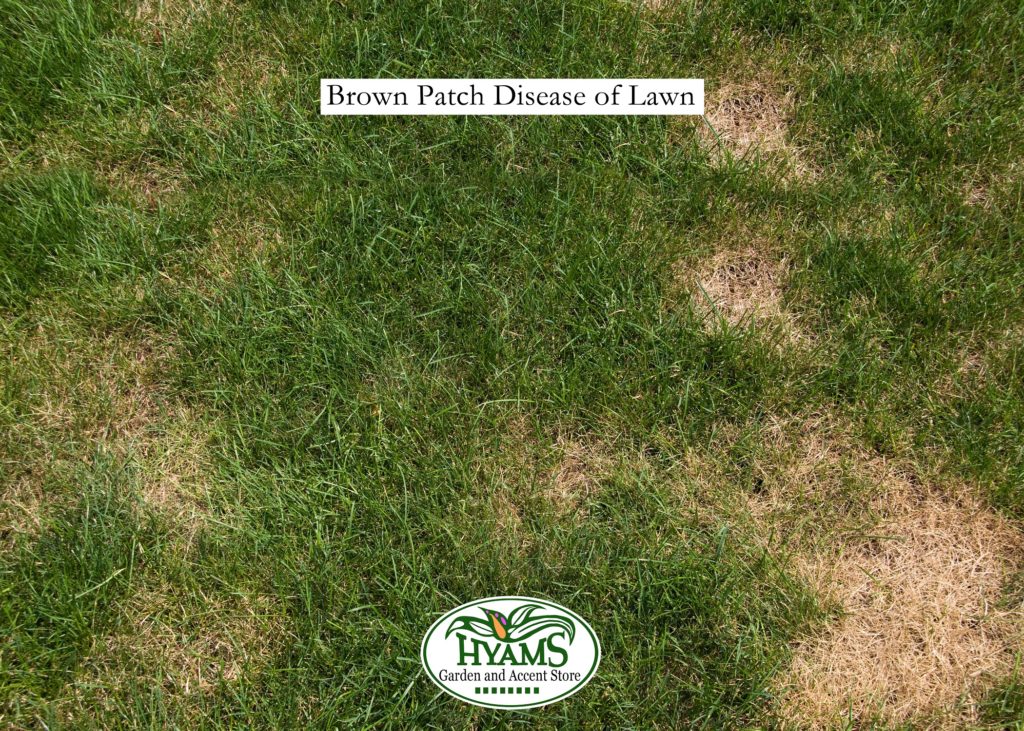
Brown patch and large patch are serious fungal diseases (each caused by different strains of Rhizoctonia solani) that can affect all South Carolina lawn grasses. Disease can develop rapidly when daytime temperatures are warm (75 to 90 °F) and humid, nighttime temperatures are above 60 ºF, and there is an extended period of leaf wetness. Generally, symptoms of brown patch begin on cool-season grasses (tall fescue, ryegrass, bluegrass and bent grass) during the late spring. It may also occur on these grasses during warmer periods of the winter months. Warm-season grasses (St. Augustine grass, zoysia grass, Bermuda grass and centipede grass) most commonly are affected by large patch (formerly also known as brown patch) during the early spring and late fall.

Symptoms of brown and large patch diseases may vary greatly with the type of grass and soil conditions. The diseases usually cause thinned patches of light brown grass that are roughly circular in shape. These areas range in diameter from a few inches to several feet. Often the center of the patch will recover, resulting in a doughnut-shaped pattern.

When disease conditions are favorable, large areas of the lawn may be uniformly thinned and eventually killed with no circular patch being evident. This type of pattern is commonly seen on infected St. Augustine grass grown in shady, moist locations.

All types of warm-season or cool-season lawn grasses grown in South Carolina can be affected by large patch or brown patch, respectively.

Prevention & Treatment of Brown Path Disease of the Lawn

The best way to prevent brown patch or large patch in the home lawn is by following good lawn care practices. This is much easier and less expensive than the use of fungicides and can be very effective.

  • Avoid high rates of nitrogen fertilizer on cool-season grasses in the late spring and summer. Avoid high nitrogen rates on warm-season grasses in mid to late fall or in early spring. The disease-causing fungus readily attacks the lush growth of grass which nitrogen promotes. Avoid fast-release forms of nitrogen fertilizer.
  • Irrigate grass only when needed and to a depth of 4 to 6 inches (generally 1 inch of irrigation water per week), but do not subject the lawn to drought conditions. Water early in the morning. This disease can spread fast when free moisture is present, especially greater than 10 hours.
  • Avoid spreading the disease to other areas. Remove clippings if the weather is warm and moist to prevent spread to other areas during mowing.
  • Keep lawns mowed on a regular basis to the proper height for the grass species you are growing. Lower than optimum mowing height can increase disease severity. Do not mow fescue lawns shorter than 2½ inches high, nor higher than 3½ inches. Mow centipede at 1½ inches high.
  • Provide good drainage for both surface and subsurface areas. Correct soil compaction by core aeration. Prevent excessive thatch buildup.
  • Have the soil tested and apply lime according to test recommendations. Disease may be more severe if the soil pH is less than 6.0. Keep potassium (K) level at upper end of sufficient rating on soil test.

Fungicides can be difficult to rely upon for controlling brown patch and large patch in the home lawn, but regular applications can vastly improve appearance. A good “rule of thumb” to follow on either cool- or warm-season grasses is to initiate fungicide sprays when nighttime low temperatures reach 60 °F. Stop applications when nighttime lows are forecast to be below 60 °F for five consecutive days. Typically, applications are made at 14- to 28-day intervals, depending upon the fungicide. If disease is severe enough to warrant chemical control, select one of the following fungicides listed in Table 1.

It will help in disease control to alternate fungicides used with subsequent applications to prevent a buildup of resistance to a fungicide. Slightly better control may be obtained by a liquid fungicide application rather than by granular application of the same fungicide active ingredient. Granular fungicides must be irrigated after application (follow label directions).

Dollar Spot Disease of the Lawns
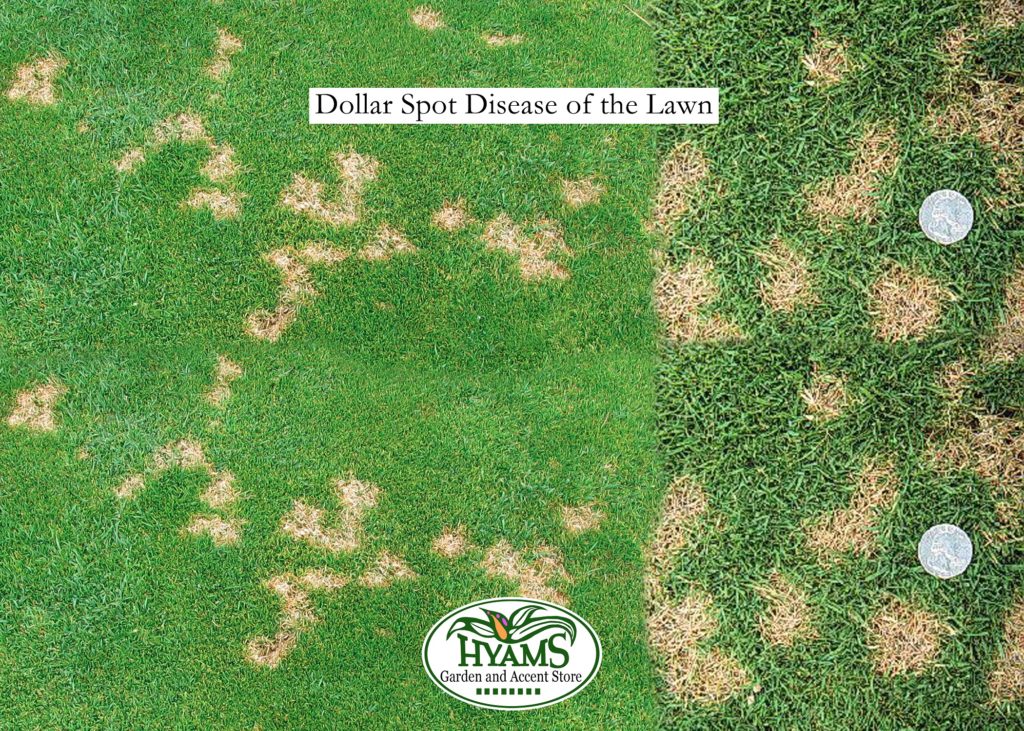
Dollar spot is caused by a fungus. It causes straw-colored spots about the size of a silver dollar (2 to 6 inches diameter) to appear on closely mowed turf. Grass in affected areas may die and the spots may merge to form larger, irregular patches. In coarse textured grass that is cut high, the dead spots are larger and more diffuse. Leaf blades have light tan spots with reddish-brown margins that develop across the leaves. Early in the morning you may be able to see a cobweb-like growth of the fungus over the infected area.

Dollar spot most commonly occurs on Bermuda grass, zoysia grass and centipede grass. Dollar spot is most active from late spring through fall. The fungus develops during humid weather, when daytime temperatures are warm (59 to 86 °F) and nights are fairly cool. These conditions result in heavy dew forming on the grass.

Prevention & Treatment of Dollar Spot Disease:

Adequate fertilization will help the lawn overcome this disease. Prevent thatch buildup and remove excess thatch. Avoid drought stress by watering the lawn deeply, and thoroughly when needed, timing irrigation for early morning. Remove morning dew if possible by mowing or irrigating the lawn. Fungicide applications may be needed during moist weather in the spring and fall, when day temperatures are between 70 to 80 °F. For the home lawn, fungicides that give good control of dollar spot should contain propiconazole, azoxystrobin with propiconazole, or triadimefon. Always apply all chemicals according to directions on the product label.

[For more information go to Clemson Cooperative Extension Home and garden Information Center at http://hgic.clemson.edu/]

Filed Under: Diagnostic Center, Gardening Tips, Gardening Wisdom, What Does the Gardener Say?

June 24, 2020 By Hyams Garden Center

Water Gardening

Water gardens can add beauty, charm and a feeling of serenity to any landscape project. They can be created simply by using a watertight container on your patio or porch. They can also be designed in larger, in-ground ponds.

A water garden typically consists of Floating Plants, Marginal Plants, and Submerged Plants. It can include a Fountain or other Statuary as well as a selection of fish such as Goldfish and/or Guppies. Maintaining the best water quality requires the right mix of plants.

There are a number of online sources that can be used to research which options would be best for you.

www.wisegeek.com/what-is-a-water-garden.htm

www.clemson.edu/extension/water/stormwater-ponds/problem-solving/aquatic-weeds/index.html

www.gardeners.com/how-to/water-gardening/5078.html

Inventory of Water Plants at Hyams garden Center as of April 10, 2020

SizePrice
Acorus Clamus – Veriagated Sweet Flag5″ Pot$12.95
Colocasia Esculenta – Taro5″ Pot$12.95
Colocasia Esculenta – White Lava5″ Pot$12.95
Cyperus Alternifolius-Umbrella Palm5″ Pot$12.95
Cyperus Papyrus-Egyptian Papyrus        5″ Pot$12.95
Equisetum Hyemale-Horsetail    5″ Pot$12.95
Houttuynia Cordata-Variegated Chameleon5″ Pot$12.95
Iris – Ann Chowning5″ Pot$12.95
Iris – Black Gamecock5″ Pot$12.95
Iris – Rose Queen5″ Pot$12.95
Juncus Effusus Spiralis-Corkscrew Rush5″ Pot$12.95
Lindernia Grandiflora-Blue Moneywort5″ Pot$12.95
Myriophyllum Aquaticum – Parrots Feather5″ Pot$12.95
Myriophyllum Spp. – Red Stemmed Parrots Feather5″ Pot$12.95
Oenanthe Javanica – Variegated Water Celery5″ Pot$12.95
Pontederia Cordata – Pickerel Weed5″ Pot$12.95
Thalia Dealbata – Native Water Canna5″ Pot$12.95
Thalia Geneculata – Red Stem Native Water Canna5″ Pot$12.95
Typha Laxmannii – Graceful Cattail5″ Pot$12.95
Typha Minima – Micro-Miniature Cattail5″ Pot$12.95
Nymphaea – Darwin     8″x 5″ Pot $29.95
Nymphaea – Fire Crest8″x 5″ Pot $29.95
    Nymphaea – Teas Dawn8″x 5″ Pot $29.95
Nymphaea – Virginalis8″x 5″ Pot $29.95
           Nymphaea – Alexsis     8″x 5″ Pot $29.95
Nymphaea – Lindsey8″x 5″ Pot $29.95
Nymphaea – Rhonda8″x 5″ Pot $29.95
       Nymphaea – Ruby Red8″x 5″ Pot $29.95
Nymphaea – Tina8″x 5″ Pot $29.95

Filed Under: Garden Center, Gardening Tips, Gardening Wisdom, What Does the Gardener Say?

February 1, 2020 By Hyams Garden Center

The Art of Bonsai: A Thousand Years Old and Still going Strong

The ancient art of Bonsai began over a thousand years ago in China and was actually known then as Pun-Sai. Later, Japan adopted many cultural trademarks of the Chinese with this art form being one of them. The name then became bonsai meaning, “tray planting.” As time progressed, the ideals of bonsai changed and for the Japanese, bonsai became a representation of the combination between their ancient beliefs and the Eastern way of thinking – the harmony found between man, the soul and nature. In today’s world, bonsai is a great symbol of Japanese culture that can be experienced all over the world.

Caring for a bonsai is not very difficult. Be sure to keep the bonsai evenly moist at all times and when watering, water thoroughly when the surface soil becomes dry to the touch. Let the bonsai dry out before you water it and use a gentle spray for watering through the foliage to keep it clean. When the temperatures are high and humidity is low, bonsai should be watered once a day.

If you have a needled evergreen, keep it outside in part to full sun. Maples, elms, and other deciduous trees should be in filtered sun along with subtropical bonsais. Be sure to let you bonsai be outside every so often to keep it healthy.

When fertilizing, use a fish emulsion fertilizer diluted to 1/3 of the manufacturer’s directions. Liquid fertilizer should be applied every two weeks from spring to mid-summer. Use this diluted fertilizer as though you were watering your bonsai, but DO NOT spray the fertilizer directly on the foliage, spray into the soil only!

If you are looking for a bonsai, check out the nice selection at Hyams in the Greenhouse!

Filed Under: Garden Center, Gardening Tips, Gardening Wisdom, Green House, What Does the Gardener Say? Tagged With: Fish Emulsion Fertilizer, Good Watering Practices, Hyams Green House, Summer Watering, The Art of Bonsai

November 5, 2019 By Hyams Garden Center

Planting and Care of Amaryllis

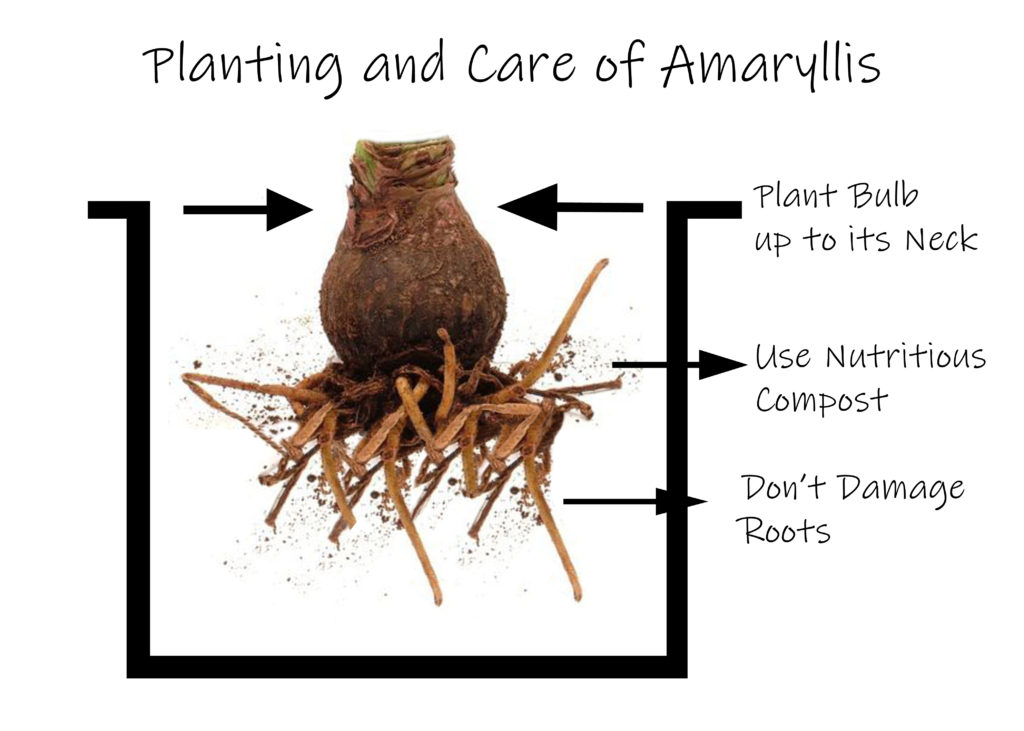
Plant amaryllis bulbs in nutritious potting compost, many are available pre-mixed. Plant the bulb up to its neck in the potting mix with compost, being careful not to damage the roots. Press the soil down firmly to set the bulb securely in place after planting.

Placement and Watering

Plant the bulb, or place the potted bulb in a warm place with direct light since heat is necessary for the development of the stems. The ideal temperature is 68-70. Water sparingly until the stem appears, then, as the bud and leaves appear, gradually water more. At this point, the stem will grow rapidly and flowers will develop after it has reached full growth.

Flowering Period

Bulbs will flower in 7–10 weeks as a general rule. In winter the flowering time will be longer than in spring. Set up your planting schedule between October and April with this in mind.

After-Bloom Care

After-Flowering: After the amaryllis has stopped flowering, it can be made to flower again. Cut the old flowers from the stem after flowering, and when the stem starts to sag, cut if back to the top of the bulb.

Leaf Growth and Development: Continue to water and fertilize as normal all summer, or for at least 5-6 months, allowing the leaves to fully develop and grow. When the leaves begin to yellow, which normally occurs in the early fall, cut the leaves back to about 2” from the top of the bulb and remove the bulb from the soil.
Bulb Storage: Clean the bulb and place it in a cool (40-50), dark place such as the crisper of your refrigerator for a minimum of 6 weeks. Caution: Do not store amaryllis bulbs in a refrigerator that contains apples, this will sterilize the bulbs. Store the bulbs for a minimum of 6 weeks.
Plant Again: After 6 weeks you may remove the bulbs whenever you would like to plant them. Plant bulbs 8 weeks before you would like them to bloom.

GROWING AMARYLLIS: Gardeners in areas where temperatures do not go below 10 (Zones 8-10) can plant Amaryllis bulbs directly in the ground. Choose a site with full sun (at least 6-8 hours of direct sun daily) and well-drained soil. In frost-free areas, plant the bulb with the neck at, or slightly above, ground level. Once growth starts, water only if rain is infrequent and the top two inches of soil are dry. After the leaves appear, fertilize with a balanced fertilizer (such as 10-10-10); repeat once a month through April. From June through September, keep the area dry. If leaves turn yellow, cut them off at the base.

POTTING AMARYLLIS: Pot bulbs individually in 6-7” pots or group 3 bulbs together in a 10-12” container. Begin by placing a well-drained potting mix in a plastic tub. Slowly add warm water and stir with your hand until the mix is moist but not soggy. Then fill the pot about half with potting mix, set the bulb on top of the mix and fill in around the bulb with additional mix. Adjust the position of the bulb as needed, so that the top third of the bulb is exposed. The final level of the mix should be about ½” below the rim of the pot to allow for watering. Firm the mix and water lightly to settle it around the bulbs. Then follow the “Pre-bloom Care” instructions below.

PRE-BLOOM CARE OF AMARYLLIS: Place the pot where the temperature remains above 60. The warmer the temperature (70-80night and day is ideal), the faster the bulb will sprout and grow. Providing bottom heat (by setting the pot on a propagation mat or on the top of a refrigerator) may help stimulate growth. Water only when the top inch of the potting mix is dry to the touch. Watering more frequently, particularly just after potting, can cause the bulb to rot. (If the pot is covered with Spanish Moss, lift the moss and pour water directly on the potting mix.)
Growth generally begins in 2-8 weeks. Certain varieties of Amaryllis may take more time to sprout. As long as your bulb remains firm, be patient and take care not to overwater. Provide ample sunshine (a south-facing window or a sunroom) as soon as the bulb sprouts. Rotate the pot frequently to prevent the flower stalks from leaning toward the light.

HOW TO GROW AMARYLLIS BULBS IN WATER

Using a Shallow Container: Select a wide, shallow container no deeper than 4” with enough room to fit as many amaryllis bulbs as you want. Fill it halfway with gravel or stones. Place gravel or stones around the bulbs until only the tip 1/3 of the bulbs is visible. The gravel holds the bulbs steady and ensures that they remain upright. Add enough water to the container to fill the bottom but not touch the bulbs. The roots will grow down into the water. Don’t let waster touch the bulb. It will cause it to rot. Place the container in a cool, dark room until you see root and top growth, about 2 to 3 weeks. Check the water level daily. The room should remain at 50-60℉. Using an unheated garage is ideal. Move the container into a bright room, but keep it out during the day and do not fall below 60℉ at night. Check the water level daily. It should still not reach the bulbs. The amaryllis will bloom in 6 to 8 weeks after being moved into the bright room and should last for 4 to 6 weeks.

Using a Glass Vase: Select a glass vase narrow enough to keep the amaryllis bulb in the neck, or use a forcing vase. Fill the bottom of the vase with water. Place the bulb in the vase, making sure it does not touch the water. Place the vase in a cool, dark room until you see root and top growth, about 2 to 3 weeks. Move the vase into a bright room but keep it out of direct light. You will have blooms in 6 to 8 weeks.

Filed Under: Garden Center, Gardening Tips, Gardening Wisdom, What Does the Gardener Say?

  • « Go to Previous Page
  • Page 1
  • Interim pages omitted …
  • Page 15
  • Page 16
  • Page 17
  • Page 18
  • Page 19
  • Go to Next Page »

Primary Sidebar

Find us on Facebook

Hyams Garden & Accent Store

Recent Posts

  • The Charleston Garden in Transition: Beauty Between Summer and Autumn
  • A New Season Begins: Planting for Fall in the Lowcountry
  • Before the Weeds Wake: Preparing Your Charleston Lawn for Fall

Categories

  • Accent and Gift Store
  • Bedding Plants
  • Candles
  • Christmas Décor
  • Custom Designed Containers, Pots, Window Boxes and Baskets
  • Diagnostic Center
  • Everyday Gift Items
  • Featured Articles
  • Festive Décor for Various Seasons
  • Fountain Installations
  • Fountains
  • Garden Center
  • Garden Store
  • Gardening Supplies
  • Gardening Tips
  • Gardening Wisdom
  • Green House
  • Hear the Flowers Whisper!
  • Home and Garden Accents
  • Home Décor
  • Join Our Team
  • Life like Botanicals and Flowers
  • Nursery
  • Outdoor Décor
  • Planters and Pots
  • Seasonal Décor
  • Services
  • Statuary
  • Uncategorized
  • What Does the Gardener Say?
  • Wreathes, Bows and Ribbons

Copyright © 2026 HyamsGardenCenter.com